Applies to
ApexSQL Doc
Summary
This article describes why CHM documentation output cannot be seen and how to fix it
Symptoms
When opening database/SSIS documentation created in ApexSQL Doc, due to security settings, the content of the output file fails to appear, and one of the following messages will be displayed instead of the content:
- Navigation to the webpage was cancelled
- Action canceled
- Page cannot be displayed
- This program cannot display the webpage
Reason
A CHM file contains compiled HTML files and as such, it can contain harmful scripts. That is why Windows security updates may block its content.
Workaround
For this issue, there are several workarounds:
- The most common solution is to simply unblock a trusted CHM file:
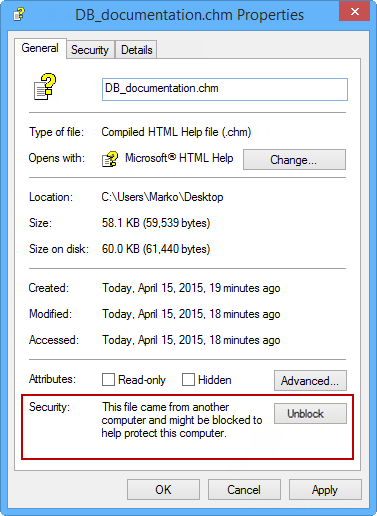
- Right click your CHM file and select "Properties" on the popup menu.
- On the "General" tab, click the "Unblock" button.
-
Then click "OK":
-
Type the following command in the command prompt (run as administrator): “regsvr32 hhctrl.ocx”. The following message will appear:
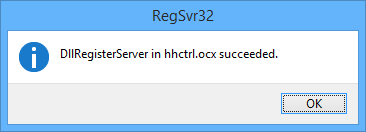
After this, open a CHM document
- Hash (#) is a registered character, used for hyperlinks. This character cannot be used in the CHM file name and directory name (as well as "?","&" and "+" characters). All those have special meaning. Remove all hashes and other special characters from the file and/or directory name
- If a CHM file is stored remotely (network drive) or on a remote server and the associated security zone is restricted, the content of the CHM file will not be displayed. The following are steps to follow, to troubleshoot this issue:
- Run the regedit command from the command line
-
Locate and then click the following sub key:
HKEY_LOCAL_MACHINE\SOFTWARE\Microsoft\HTMLHelp\1.x\ItssRestrictions
Note: If this registry sub key does not exist, then it needs to be created
- Right-click the ItssRestrictions sub key, choose the New option from the menu, and then click the DWORD Value option, from the sub-menu
- Type MaxAllowedZone value, and then press ENTER key
- Right-click the MaxAllowedZone value, and then click the Modify option
- In the Value data field, type a number from 0 and 4 (1 will be enough in most cases), and then click OK
The values settings are:
0 = My Computer
1 = Local Intranet zone
2 = Trusted sites zone
3 = Internet zone
4 = Restricted Sites zone